
How to Apply Waterslide Transfers
- Tim Draper
- Mar 23
- 4 min read

Waterslide decals are essentially small printed images that when soaked in water will come loose from the backing paper, and can then be applied to the surface of a model.
White and No White Background
The decals supplied with Retro Replica model kits come in two different types.
1. Without printed white detail (as supplied with the GP200 premium decal sheet)
With this type of decal, any white features in the image, are not included as part of the printed decal. For these types of decal, you must first paint the white background on your model before applying the decal over the top. The decal sheet will always be annotated so that you know which decals require painted white background.
2. With printed white detail (as supplied with the SX200 kit)
With this type of decal the white elements are also printed on the waterslide. This means you do not have to worry about painting a white background.
Cutting Out the Decal
The first step is to cut out your decal from the decal sheet. For this, you can use a craft knife or scalpel. Cut the decal as close as you can to the printing without slicing into the decal itself. One trick that you can employ is to leave a bit of a “grab handle” on one side, so that you can grip the decal paper with tweezers. If this will leave a wide bit of decal film on one side, just make a thin slice in that area that is just deep enough to cut through the film, but not all the way through the paper.

Decal Cutting Steps
1. Cut the decal as close to the printing as possible.
User a craft knife or scalpel to carefully cut around the decal.
2. Leave a tweezer tab for small decals.
Try lightly cutting through the decal layer, but not paper to ensure the tab does not transfer to the model surface.
Decal Cutting Checklist
Decal sheet
Craft knife or scalpel
Cutting mat
Applying the Decal
Prepare workspace
Have a shallow bowl full of warm water, paper towel, tweezers, fixing solution, knife, cutting mat and brush ready for the process in your workspace.

Prime the Model Surface with Setting Solution
While you can place decals directly down onto a glossed surface, for most decals, it is recommended to apply a bit of setting solution. We recommend Humbrol Decalfix, Microscale Micro Set or Tamiya Decal Adhesive. Apply the setting solution with a brush where the decal is to be placed.

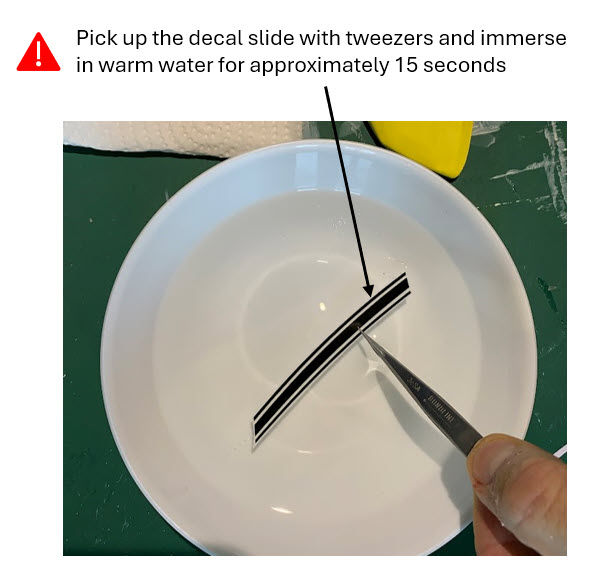
Soften & Release the Decal
Next, use the tweezers to dip the decal fully into the warm water. Give it a count of 10-15 seconds. Remove the decal from the water, and set it on a piece of paper towel, face up. Using a clean brush, test it a bit to see if it’s loose. The warm water will help loosen most decals up really fast. If it is not loose, leave it for about 30 seconds. If after that time, it’s still not loose, use your brush and apply more water to it. Never dip the decal back into the water, quite often, the force of the water hitting the decal will lift up the edge, and it will fold back on itself.
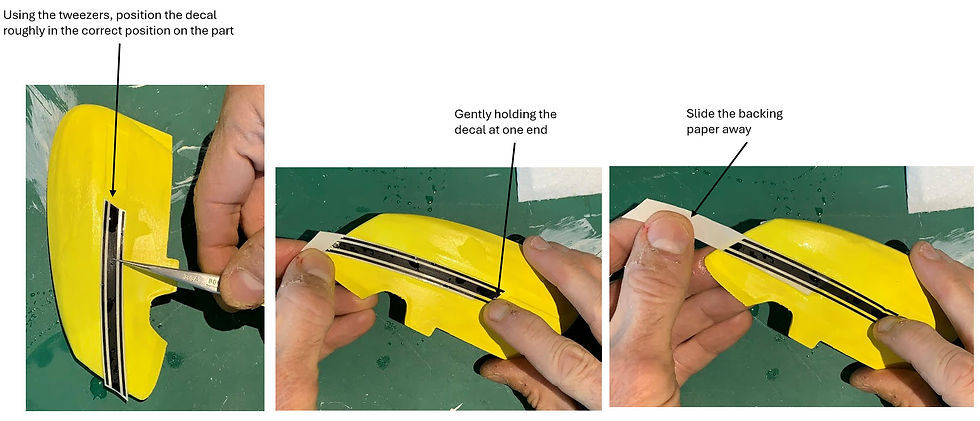
Apply the Decal
One it is loosened, pick it up with the tweezers by the backing paper (this is where the grab handle mentioned earlier comes in handy) and hold it flat to the surface where you will apply it. Gently using your finger, or for small decals, a toothpick or paint brush, gently slide the decal on to the model’s surface, right on top of the setting solution.
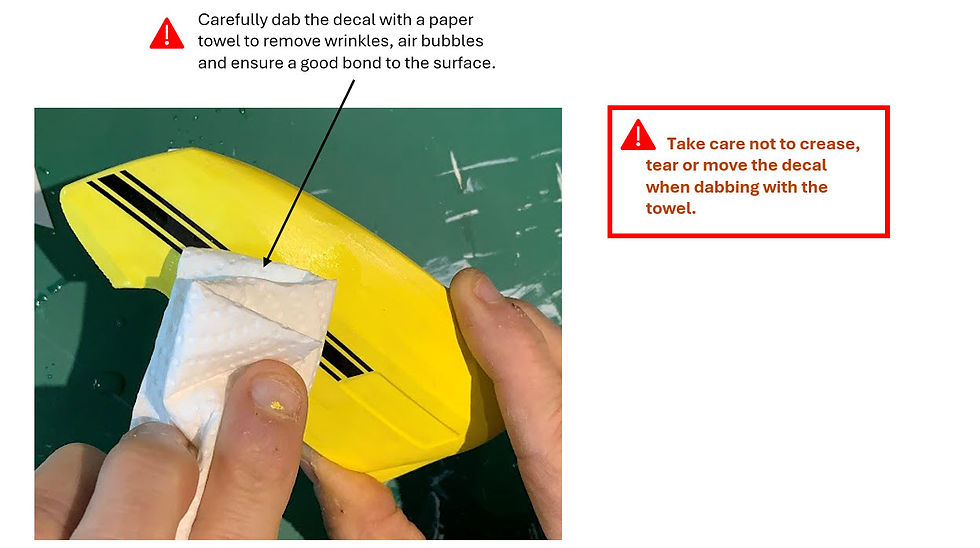
Force Water Out
Ensure the decal is in the correct position, then carefully dab the surface with the edge of a paper towel. For smaller decals, use the side of a cotton bud to gently push into the centre of the decal and slowly begin to roll the cotton bud along towards the outer edge of the decal. The idea here is to force out the water from underneath. Even though it looks to be lying flat, you’d be surprised how much water is underneath that little decal. Keep gently working your way around the decal, until you get no more water out from underneath. Always work from the interior of the decal out. Reversing that may cause the edge of the decal to roll up with your cotton bud.
Seal the Decal
Give the decal a minimum of 3 hours to set. Then apply a clear coat over the surface of the decal to seal it in place. You can use a matte or gloss seal depending on the part in question.

Decal Application Steps
1. Prepare Workspace.
Have a shallow bowl full of warm water, paper towel, tweezers, fixing solution, knife, cutting mat and brush ready in your workspace.
2. Cut out the decal.
Use craft knife / scalpel and cut as close as possible to the decal image.
3. Prime the model surface.
Apply fixing solution to the target surface with a bush.
4. Soak the waterslide transfer in warm water.
Pick up the waterslide transfer with tweezers and dip into the water for 10 – 15 seconds.
5. Apply the transfer to the model surface.
Apply the transfer in the correct location and whilst holding the edge of the transfer, gently slide the backing paper away.
6. Remove water from behind the transfer.
With the edge of a paper towel or a cotton bud, gently squeeze the water out, starting from the centre and working towards the edges.
7. Seal the decal.
After waiting a minimum of three hours, finish the part with clearcoat to seal the decal.
Decal Application Checklist
Shallow bowl of warm water
Paper towels
Tweezers
Fixing solution
Knife
Cutting mat
Brush


Comments